Just so that you know, there is a new StackExchange beta site: Astronomy. You can ask astronomy-related questions there, or search for questions other people have asked. Hopefully, you will get some good answers.
Category: astronomy
Installation of the EQ3 SynScan Upgrade
I just got the Skywatcher EQ3 SynScan Goto Upgrade. It comes with lots of documentation. For example on how to wire up the controller boxes. However, it does not explain, how to mount the motors, that come with the upgrade box! And neither does the EQ3-2 manual.
Hence I will describe how I installed the motors. I don’t know if I did it correctly, but my SynScan seems to work, so I cannot be far off. If you use this description for assembling your own upgrade kit, you do it on your own risk! You have been warned… By the way, one screw was left over in the end. But isn’t it always?
So the first thing to do is to remove your telescope, your counterweights and the flexible tuning knobs. This leaves you with your tripod and your EQ3 mount. I am describing this for my EQ3-2 with aluminium tripod (rectangular legs). If you have an EQ3, NEQ3 (round legged steel tripod) your mileage may vary. The manual first tells us to mount the holders for the motor controller and the SkyScan controller. The first one is a bugger: it’s made for the round legged tripod. But do not fear! We can use a rubber band to help it stay affixed to the aluminium legs. Make sure the ground plate has contact with the aluminium legs!
Next up are the gears for the motors. They are not labelled, so I had to figure them out myself. The big one is for the Dec motor, the small one for the RA motor. The motors themselves also were not labeled. The naked one is the RA motor, the boxed one is the Dec motor.
Ok, so we will begin with the RA motor. This is the place where it will be mounted:
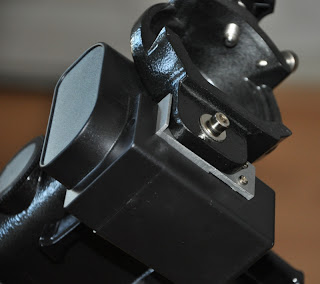
There is already a screw here, and the axle for the gear. Mount the RA gear on the axle, so that it fits nicely with the end of the axle. This will be the right height for the RA motor gear. use the two small inset screws to firmly attach the gear. Make sure not to make it to loose, nor to tight! Then you can attach the RA motor as pictured on the mount point. The mounting plate will fit snugly into the corner of the mount, and will keep the motor in place. You can jiggle it around before fastening the screw, so that the two gears fit well together. Check the photos on how this should look from the front and behind.
You noticed that there is a cable hanging from the RA motor. Find the black casing with the two DIN sockets. It will have a fitting socket for the dangling cable. Attach both and put the casing on top of the motor and the gear assembly. Take good care to carefully wrap the coloured cables into one corner of the black box! They fit in there, without any trouble, but you have to find the right corner. If you managed to fit the box, you will see two screw holes ligning up on the front and top of the box.
Use the two tiny black screws to fixate the RA box. The top screw might be hard to reach, even with the small screwdriver that comes with the kit. I used a ratchet with a PH bit for this part.
Ok, that’s the RA assembly. Now for the Dec motor. The mounting point for this is on the other side of the EQ3. See the picture for details.
The mount point where the screw belongs is circled. first, attach the Dec gear. Leave about 1/2 mm space between the mount and the gear. Again, there are two small inset screws to fasten it. You can adjust the gear again later, if needed. Now attach the motor using a screw and a washer (they come with the upgrade kit). With both motors, test if the gears touch tightly enough, so they will not skip, and they will not have too much friction either. See the picture for a view of the mounted motor. Strangely, I could not get the Dec gear to be parallel with the motor gear. But still, the whole thing works. I might try to re-align it later.
That’s it! Now you only need to attach all the cables, as described in the manual, and you’re ready to go, or to go-to. 🙂 I still had one thing left: a black soft rubber thing. If anyone knows what it is for, please drop me a note. It was not described in the manual either.


